

How To Install A One Piece Tub Surround
How to Install a Bathtub: Install an Acrylic Tub and Tub Environs
Updated: Mar. 09, 2022
Remove an old plastic bathtub and environment and install a new bathtub and 3 slice surround with new plumbing and a tile border.

In this story, we'll walk you through a basic installation procedure, beginning with what is oftentimes the toughest function—trigger-happy out the former tub and shower. And so we'll show you lot how to install and replumb the new unit. And finally, we'll show you a tiling technique that simplifies the finish work and makes the entire installation expect great.
Yous might also like: TBD
- Time
- Complexity
- Price
- Multiple Days
- Intermediate
- $501-1000
Planning
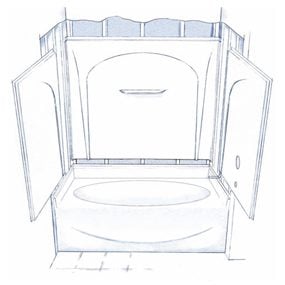
Figure A: Four-piece bathtub/shower
Typical four slice tub/shower kit including tub, 2 end panels and back wall panel
An acrylic tub and shower surround may not have the sex appeal of an enameled cast iron tub and an elegant ceramic tile surround, merely information technology'due south a lot easier to keep make clean and looking spotless. Information technology wipes off quickly and has few joints to catch mold-attracting dirt and scum. And the unit of measurement is much easier to install. Nigh models consist of a tub plus three shower wall panels, which all interlock and seal. It'southward the perfect item for a weekend bath upgrade. (OK, a full weekend.)
In this story, nosotros'll walk you through a basic installation process, offset with what is frequently the toughest part—tearing out the old tub and shower. And so we'll show you how to install and replumb the new shower. And finally, we'll evidence you lot a tiling technique that simplifies the finish work and makes the entire installation look great.
This project is a bit circuitous for a beginner. You should have some experience working with plumbing (P-traps and/or faucets) and basic carpentry tools. If y'all replace the shower valve and have copper supply lines, you'll need soldering skills. Our tub/shower unit cost $300 ("Acclaim" by Sterling), and other materials (new shower valve, tile, etc.) cost about $200. This price tag could easily double with a higher priced tub and environs and fancier valves. If y'all exercise it yourself, y'all'll save the $one,000 cost of professional installation.
Begin by measuring the approximate length and width of your existing bathtub. Allow nearly 3/4 in. extra at each wall and your measurement should be close to one of the standard tub sizes. Most are 5 ft. long and 30 in. wide and are designed to fit against the wall studs (Figure A). And so shop for tubs and surrounds at home centers or kitchen and bath specialty stores. Then order your tub. Acrylic replacement tubs are light plenty for one person to lift in and out, even in tight spaces. But beware of one piece bathtub shower surrounds and one-piece tub/shower stalls. They're usually too bulky to become into an existing bath. Likewise pick up a new drain and overflow assembly (Figure B), clear silicone kitchen/bath caulk and the other materials shown in the photos. This is as well the perfect time to supervene upon the sometime shower valve, spout and shower arm.
Remove the tub faucet and shower head
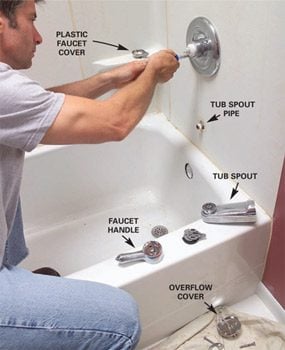
Photo 1: Remove the faucet, tub spout and shower caput
Pry the plastic comprehend off the faucet and remove the screws that hold the handle and trim plate. Unscrew the tub spout and tub overflow cover.
Before beginning, spread a thick canvas dropcloth over the bathroom floor and whatsoever nearby fixtures. Find the shutoffs for the tub—commonly backside an access panel in an adjacent room—and turn off the h2o. Then turn the tub faucet on to make sure the shutoffs actually piece of work. If water continues to drip out, plow off the main water supply and replace the shutoffs. (Here are details on replacing the shutoff valves.) At present remove the faucet hardware (Photograph one). Most faucets are held past screws. Look for an Allen screw in a recess under the tub spout. If it doesn't have 1, it'due south probably a spout that y'all unscrew (counterclockwise) with a pipe wrench. Wrap a rag around the jaws if you're planning to save or reuse the spout. Unscrew the shower arm with the pipe wrench also.
Tear out the old bathtub surround

Photo 2: Cut through the drywall
Cut the drywall slightly outside the edge of the old surroundings. Use a utility pocketknife with a abrupt blade and score several times until the blade slices completely through.
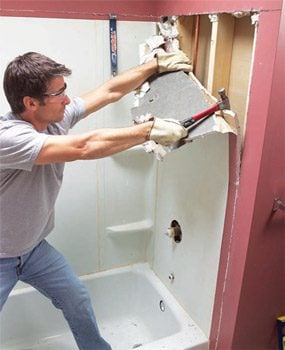
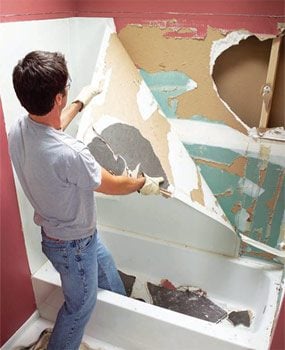
Photo 3a: Pull the drywall and tub surround from the studs
Pull off the drywall with a hammer and pry bar, working from the edges. Keep an center out for wires and pipes. Wear safety glasses!
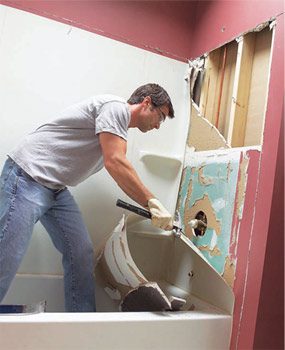
Photo 3b: Pull the tub surround away carefully
Keep your arms and face up clear of precipitous edges
Photograph 3c: Tear out the back section
Pull the tub surround panel free if the drywall is stubborn, then get dorsum and remove the drywall.
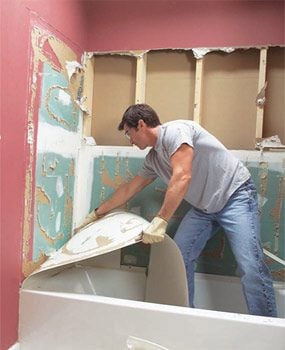
Photograph 3d: Remove the final panel
Remove the cutting out drywall afterward pulling away the last pane. Remove any screws or nails from the exposed studs.
To reduce hassles later on, check the dimensions of the new tub surround (including the nailing flanges) earlier you cutting out the old surround or tile wall. Then make your cuts about one in. larger than the "crude-in" dimensions of the new tub surround (Photo 2). Cut through the drywall around the tub and down to the base trim. Cover or disconnect the tub bleed to keep the waste line from filling with debris. The utility pocketknife scoring method we bear witness takes some strength, but information technology avoids the problem of cutting into insulation and hidden wires and pipes. If you utilize a drywall or keyhole saw, cut carefully and keep the cut shallow.
Many older tub surrounds are glued to drywall, as ours was. If and so, pull out the old drywall and environs with a hammer, pry bar and your easily, starting at the top and working downwards (Photos 3a, b, c and d). This also works for tile over drywall or backer board. Wearable a dust mask if the drywall is moldy or y'all're destroying former plaster. If the one-time surround was screwed into identify, simply back out the screws.
Remove the old bathtub

Photo 4: Disconnect the waste product lines from the tub
Open the admission panel in the adjacent room and loosen the slip nuts connecting the old overflow and drain to the trap. Use sideslip-joint pliers, if necessary.
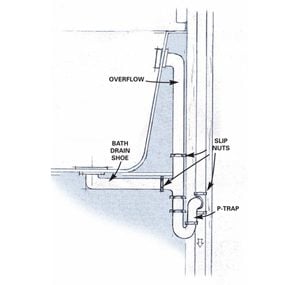
Figure B: Bleed details
Remove the overflow and bath drain shoe from the old tub.

Photo 5: Lift i end and remove the tub
Cutting the apron at one end (plastic tubs) with a jigsaw, slice the caulk forth the floor, remove any fasteners, and lift the tub up and out.
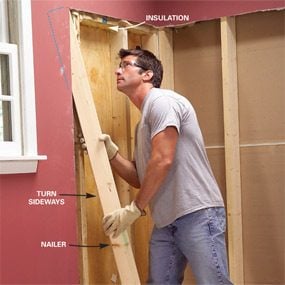
Photo vi: Install two×4 nailers
Cutting ii×4 nailers the length of the opening, slip them backside the drywall edges. Drive ane-i/4-in. screws through the drywall to anchor them. Restore the insulation and vapor barrier.
To disconnect the drain lines, remove the admission panel in the neighboring room that gives admission to the plumbing. Unscrew the tub drain and overflow where it joins the P-trap (Photo 4 and Effigy B). If the one-time waste and overflow connections are stuck, cutting them with a reciprocating saw or hacksaw and unscrew the stubs later when the tub is out. Supplant one-time metal traps with new plastic ones. If yous plan to supplant the shower valve, remove it now.
Information technology's normally hard to get an former tub out in one slice. With a fiberglass or acrylic tub, cut out a chunk with a jigsaw and elevator out the tub (Photo 5). Steel tubs are tougher; you lot may take to remove drywall and slide them out, although yous can often tip them up and out as well. Cast iron tubs are besides heavy to lift out. Break it up with a sledge. You have to slide in new bandage iron tubs.
Remove whatsoever moldy insulation and add new 2×4 nailers as needed to back up drywall edges and the new tile capitalist that you'll add later (Photo half dozen). Anchor these with screws driven through the drywall. It's not usually necessary to nail them to solid framing. Merely don't add nailers at the drain end of the tub until the new tub is in. You may demand the extra wall space when you're tipping in the new tub.
If you have mold, scrub it away and permit the surface area dry thoroughly earlier covering it with insulation and a vapor barrier.
How to replace a bathtub

Photo vii: Check for tub level
Ready the new tub into place and bank check it for level. Figure the shim size needed to level it, then remove the tub and tack the shims at the tub leg positions.
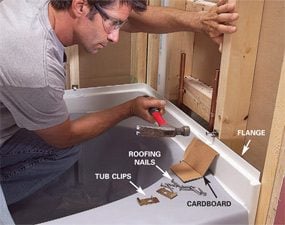
Photo eight: Spike the tub to the studs
Fasten the tub to the studs. Shim gaps between the studs and the flange to avert stressing the rim. Protect the tub with heavy cardboard as y'all boom
Unpack the new tub and ready information technology into place. Before you lot begin the bathtub installation, cheque the tub rim for level, both front end to dorsum and side to side (Photo 7). The nailing flanges on plastic tubs are not meant to deport weight, and then the tub legs must have solid, level bearing on the floor. Shim spaces less than 1/2 in. with hardwood, metallic or plastic spacers (don't use softwood for tubs with small legs considering the wood will crush). For thicker shims, use boards or strips of plywood. Utilize wide spacers and smash or glue them into identify at the leg locations so they won't shift when the tub goes in. On larger tubs, the manufacturer may enquire you to set the tub in a wet mortar bed, which volition mold to the tub bottom and provide extra support.
At this point, notation how the apron (outer edge) of your new tub meets the existing floor. At present'due south the time to plan this joint, while y'all tin can still remove the tub. If you're lucky, the new tub volition meet the floor almost similar the old one. But you may have a larger gap, or you lot may take to trim back the finish flooring to become the tub to fit. Solutions vary with the type of floor you have and the gap size. One solution for a gap is to cover the joint with a thin solid-surface or marble threshold strip. Apply silicone to glue it to the tub or floor, and caulk the edges forth the tub and floor.
Before installing the tub, add the new bleed shoe while it'due south nevertheless easy to get at (Effigy B). Lay a thick ring of articulate silicone caulk under the rim, and spiral it together post-obit the tub manufacturer's instructions.
Then install the bathtub and ballast it to the wall studs as recommended by the manufacturer. Our bathtub used special zipper clips, which we fastened with covering nails driven just higher up the flange (Photograph 8).
Tip: Protect your Tub
Make sure to protect the finish of your new tub with paper or cardboard while you're working. And go on it free of dust and droppings.
How to install the surround
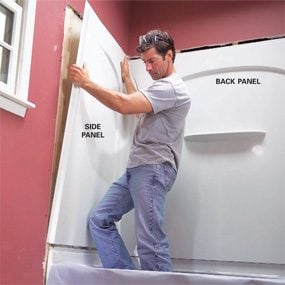
Photo nine: Prepare the back panel first
Set the dorsum surround panel into place and and then set the side panels. Chisel off protruding studs and trim the drywall as necessary to get a good fit.
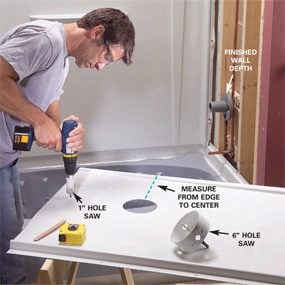
Photograph 10: Carefully measure out for the faucet and spout
Eye and install the new shower valve and copper lines. Then measure the verbal centers of the tub spout and valve and lay them out on the finish panel. Drill the end panel holes.
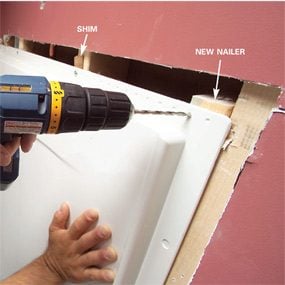
Photo 11: Fasten the panels
Fix the panels and interlock them with the tub and arrange them until the tops are even. And then predrill and fasten the flanges at each stud. Add together shims to fill gaps and keep the flange straight.
Gear up the back section of the surround on the tub rim, belongings it in place temporarily with a nail above the top flange. Then set the side panels (Photograph 9). The manufacturers permit a little play here, but non much. Chisel dorsum whatever warped or out-of-plumb studs to go on the panels sitting apartment on the tub rim. You can add a shim after if you find a gap (Photo xi). This is where setting your bathtub perfectly level pays off! The panels should marshal inside about ane/8 in. If non, recheck your tub for level.
Center the new shower valve on the tub, and solder it in identify at the recommended distance back from the finished wall (Photo 10). You may accept to shift an former valve in or out to fit the new surround.
Reset the back panel and measure to the centers of the valve and the tub spout. Take these measurements twice! Mark those points on the end console and cut the holes. Hole saws brand the cleanest cuts, but yous can also make the cuts with a precipitous 1-in. spade chip or a jigsaw (from the dorsum side).
Set up the environment panels, locking the corners. If the tops of the panels are within 1/eight in. of each other, tap the high panel downward gently with a prophylactic mallet. Otherwise, rework the tub leveling or shave wall studs to get a more perfect fit.
Anchor the panels to the wall with the fasteners specified by the manufacturer. Bulldoze them through slightly oversized predrilled holes (Photograph 11). Follow the manufacturer'due south instructions for caulking.
Finish the walls around the tub
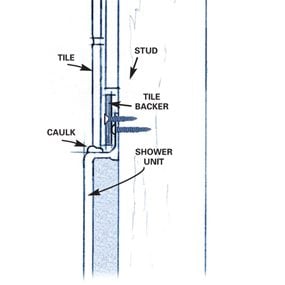
Figure C: Surround installation detail
Fill up in above the surround carefully for a shine transition to the wall board.
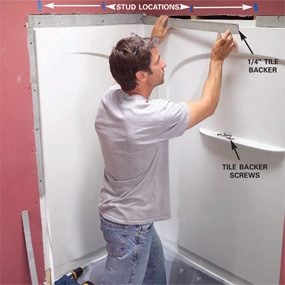
Photo 12: Fill the gaps betwixt the wall and panels
Cover the flange and gap with i/4-in. tile backer. Predrill oversized holes and drive special tile capitalist screws to avoid breaking the sparse backer board.
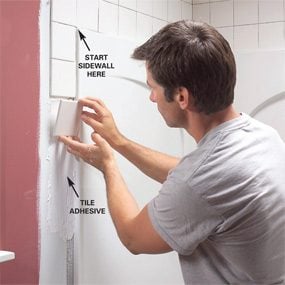
Photograph 13: Tile and grout
Tile the back wall beginning, centering the layout. Then, starting at the outer corner of the end walls, tile toward the back wall and down to the floor. Allow the adhesive ready, then apply grout.
Making a nice wall cease around the new environs requires special attending to detail. Because of the thickness of the flange, use iii/8- or 1/4-in. backer board to continue the surface flush with the drywall (Photograph 12). In addition, we chose to tile around all the edges to encompass the joint and avert a difficult taping chore. The sparse backer board is fragile in narrow strips; predrill and fasten it to the studs with the special screws designed for capitalist board. Concur it back about 1/8 in. from the border of the surround (Effigy C).
Clean and prime painted walls before tiling. Then gear up the tile, working from the outside corners on the stop walls and from the eye on the back wall for a symmetrical layout (Photo 13). Caulk the tile/tub articulation the day later y'all grout.
Install the finished plumbing

Photo fourteen: Fit the faucet trim
Attach the cover plate and valve handle. Add caulk and snug the spout into identify
Now finish the plumbing. Spread a dewdrop of silicone around the edge of each hole in the surround and install the faucet plate and tub spout. (Avoid bowing the surroundings in when tightening.) Cut the new drain line and overflow to length and claw them upwardly to the P-trap and tub. And so run water into the tub to test for leaks.
Editor's Annotation: Dealing with Old Pipes
Finding old steel pipe in the wall doesn't mean you have to replumb the entire firm. Yous can make a transition from galvanized water supply pipe to copper or plastic (CPVC). For copper, use a special dielectric coupling—a fitting that prevents corrosion. If you have steel drainpipes, use a special "mission coupling" for transitions to plastic drains. All these fittings are available at hardware stores and abode centers in many sizes.
Required Tools for this Project
Have the necessary tools for this DIY project lined up earlier you commencement—you'll save time and frustration.
Required Materials for this Project
Avoid final-minute shopping trips past having all your materials gear up ahead of time. Hither's a listing.
Originally Published: November 29, 2022

Source: https://www.familyhandyman.com/project/install-an-acrylic-tub-and-tub-surround/
Posted by: mcclintonbeettlefor.blogspot.com
0 Response to "How To Install A One Piece Tub Surround"
Post a Comment