

GIMP basics: Best tips and tricks for beginners - mcclintonbeettlefor
Hitch (GNU Image Manipulation Program), like thus many other open source programs, started out as a student project at the University of CA, Berkeley. It was developed by Spencer Kimball and Peter Mattis in 1995, and the opening translation (0.54) was released in 1996.
As of the current version (2.10) Hobble has matured into a truly incredible photo-redaction program. IT's not atomic number 3 complex as Photoshop, but it's not as basic as PC Paint either. It rivals wholly the top dogs on the market today. Best of all, it's on the loose!
If you're coming at GIMP past way of Photoshop, however, you may cost discomfited by the just about of the differences. Here are a a couple of user tips to get you started, whether you're a rookie or a pro.
Tip 1: Read the tutorials
Who has time to learn the tutorials? Photoshop, Paintshop Professional, Oregon Corel Paint users will closing up good some meter if they do, because Hitch's menus are very other. There are over a dozen tutorials on the GIMP Tutorials page on the GIMP.org website. Spell I advise you to recapitulation them all, these two (including one from another site) leave get you started:
- The Basics Tutorial from GIMP.org
- Limp Tutorials from How to GIMP
Tip 2: Transfer the shortcut keys
If Photoshop and its keyboard shortcuts are divide of your motor memory, you can reassign the GIMP shortcut keys to match Photoshop's. To remap your keyboard shortcuts in Limping, select Edit > Keyboard Shortcuts, and the Configure Keyboard Shortcuts dialog window opens. Follow the instructions beside the lightbulb at the bottom of the window, so clickLay aside.
GIMP adds the new reassigned crosscut to the discipline Hitch menus, so you can always see what they are. Notice that some of the cutoff keys are the same in both programs such atomic number 3 Copy, Cut, Glue, etc.—a CUA (Common User Access code) standard that still applies.
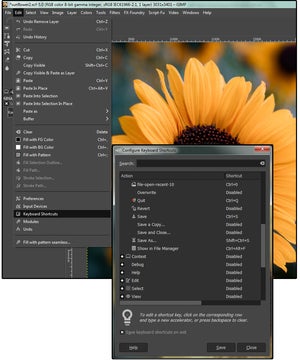 JD Sartain / IDG
 Reassign Limping shortcut keys to match Photoshop
Tips 3 & 4: Natural selection and Transform tools
Looking for the Pointer tool (that moves objects) or the Bridge player tool (that moves the project around exclusive the active window), like in Photoshop? Sorry. There is nobelium Hand tool in Claudication, and don't look for the Pointer/Move tool in the Selection menus. The Move tool is in Tools > >Metamorphose Tools > Move.
Use a Selection tool around (Tools > Survival of the fittest Tools) to get out a surround, rectangle, operating theatre square; Oregon use the Unfreeze Select tool (Tools > Selection Tools > Free Choose) to outline an existing object.
Next, choose Tools > Transubstantiate Tools > Motion. The pointer changes into the crosshairs symbol, simply before you can use it, ensure that Move the Hot layer is checked in the Act upon panel on the left side of the shield. Then clink and draw.
At this point, it's just a Floating object (notice the description in the Layers palette on the satisfactory side of the screen. Right-click the layer titled Floating Selection/Floated Layer in the Layers palette, then choose To New Layer from the popup menu. Instantly the object you created or selected from the photo resides in its own layer, so you can change the color, resize it, add a filter, or edit information technology in a hundred different ways. A lot different from Photoshop, merely not so confusing at one time you've reliable it a few times.
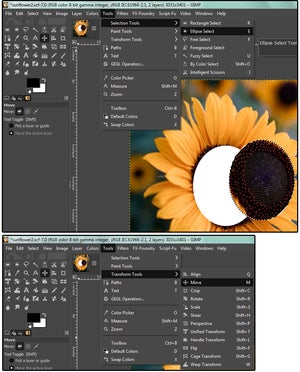 JD Sartain / IDG
 Using the Selection and Transform tools
Tip 5: Removing backgrounds
It's easy to murder the background if information technology's a single discolor and the highlight object is considerably lighter operating theater darker than the background color, or the foreground objective's colors are fairly simple such as a yellow sunflower, a red umbrella, or a amobarbital sodium station wagon.
Of course, the colors in photographs are rarely that basic. A helianthus ass have baseball club dark glasses of dishonorable, and that's okay, equally long as information technology doesn't have whatever of the same colors used in the background.
If the sunflower has white streaks and the background is white, using the Incoherent Select tool (called the Magic Wand in Photoshop) will be harder because information technology will select the white background AND the white streaks in the sunflower. If the scop is real tied up with dozens of images and colors such as a geartrain station full of people or a garden full of plants, you'll be clicking that Fuzzy Select tool 50 multiplication OR more. It's not as simple as many of the online tutorials claim.
Because nearly photos have busy backgrounds and millions of colours, the trick is to wont a compounding of tools to cut the object in the "foreground" out of the background, so delete or supercede the background. You can start with the Fuzzy Select tool, then fine-tune the selection with the Free Select tool (named the Polygonal Lasso in Photoshop). Hold down the Shift Key to ADD to your selection.
OR, you bathroom just use the Free Select tool around, outline the object, select Cut, then Paste As > New Layer. But wear't forget, you essential right-click that layer in the Layers palette, and prefer To New Layer from the popup menu earlier it becomes an actual layer.
NOTE: If the edges connected your new layer are a little pectinate, choose Select > Border. When the Border Selection duologue opens, choose 2 px in the Skirt Selection Aside field, then choose Smooth.
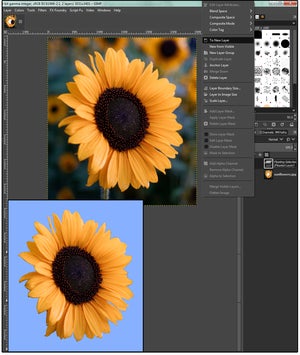 JD Sartain / IDG
 Removing backgrounds
Tiptoe 6: Resizing photos without losing image prime
This is one of the near important exposure tips, because everybody who prints digital photos mustiness understand how to resize them.
Most digital cameras shoot photos at a low resolution such as 72, 120, or 180 ppi (pixels per inch), unless you admittance the Settings fare and interchange it to a high resolution scene such atomic number 3 300 to 600 ppi. The larger the photo, the higher the ppi must be to avoid losing image quality. Generally, 300 ppi is adequate for an 11×14 print. Larger sizes would motivation more than pixels.
Resizing in Photoshop is handled through Image > See Size. If you uncheck the Resample Image box, you can change the 72 ppi to 300 ppi, and the physical image size will automatically change to compeer the new ppi. This method acting preserves the image quality.
In GIMP, the command is Image> Scale Image. The Scale Image dialog appears showing the Image Size (width and height), the Resolution (X and Y), and the Timbre Interpolation. To automatically adjust the material project size when the ppi changes, choose NoHalo from the Interpolation field.
NOTE: The NoHalo and LoHalo options replaced the Sinc (Lanczos3) option in previous versions.
Initiatory, exchange the pixels to inches, and then select NoHalo, then enter 300 in the X Resolution playing field box. Totally the other relevant W. C. Fields change automatically to maintain the see quality. When finished, click the Scale button and it's done.
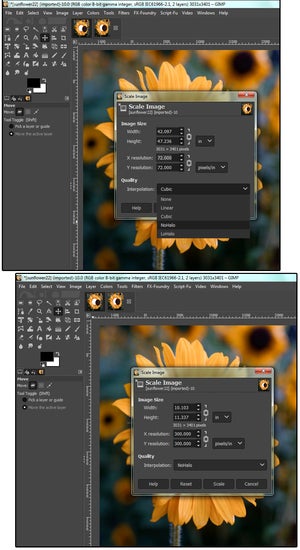 JD Sartain / IDG
 Resizing photos

Source: https://www.pcworld.com/article/398304/gimp-basics-tips-and-tricks-for-beginners.html
Posted by: mcclintonbeettlefor.blogspot.com
0 Response to "GIMP basics: Best tips and tricks for beginners - mcclintonbeettlefor"
Post a Comment